Friday, February 27, 2009

When Clean-Up Gets Creative

To end the week I thought I'd share a funny. If you work with children you get something funny each and every day, but personally I don't always get a picture.

We had multi-colored rice in one of the tables this week with pastel egg halves and little cups for scooping. At some point the rice became confetti and the area around the table had more rice than the table did. We broke out the dustpans and brushes (we only have 4 or 5 sets and we really could use more) and everyone pitched in to put the rice back.

One child felt that the rice should not only go in the table but into some sort of container. He found a large container that was holding hole punches and decided that it would make an excellent rice container. But he didn't feel the need to remove the hold punches or to keep the little cups separate from the rice. Just to make it special he added a shiny box to the top of the container.

Here's how the table looked when the children arrived for the morning:
A Pretty Sensory Table With Rice

And here's how it looked after it was "cleaned up:"
Rice, Hold Punches, Cups, and a Shiny Box

Wednesday, February 25, 2009

Corn and Bean Salsa

Today we made some salsa with the two-year olds. It was really simple. A can of corn, a can of black beans (rinsed and drained), about a cup of mild tomato salsa, and then tortilla chips to eat it with. Here are a few tips on simple salsa making (and no digs on how it's not REAL salsa since we didn't make the tomato part ourselves!):

- Get a REALLY BIG BOWL and LOTS of long-handled spoons for mixing. When you have 4 or more toddlers stirring at the same time with the corn flying, you'll understand why! We only have 10 kids. If you have more children than that, consider making two batches in different bowls so you have space for all the helpers who want to take part.

- If you have a chef in your class, invite him or her to help you drain the corn or drain and rinse the beans. In our classroom it's tough to let kids help with this part, but they were interested.

- Let them help you open the cans as much as you can. You may ask them to hold the can or try to turn the handle.

- For serving, put the salsa in bowls and provide spoons. The kids may not want to dip their chips into something they don't know about yet. Some kids may just want to dig in and eat the salsa like a side dish. We had several who didn't touch the chips, one who didn't touch the salsa, one who picked out and ate all the corn, and several who ate everything but ate the salsa separately from the chips.

Allergy Note: Got a corn allergy in your class? Omit the corn. The beans still taste good with the salsa on them. Make sure you use something other than corn tortilla chips if you use chips at all.

Friday, February 20, 2009

Cocoa Mulch

Cocoa mulch looks a lot like coffee grounds in a picture, so you'll just have to see that post for an idea of what I'm talking about. But it's lots of fun and the smell may make you run for your nearest store in search of chocolate.

From what I've seen, cocoa mulch comes in two varieties. The small kind is the kind that looks a little like a cross between flake cereal and coffee grounds from a distance. It tends to get dusty when it's completely dry but the smell lasts a long time and you can keep it for at least once school year if you put it away dry. You can use similar tools and toys as you can with sand.

The other kind of mulch is really more like bark. It has larger chunks that are too big to scoop. The kids enjoy using it for construction play as well as hiding toys. We did have a problem keeping it from getting smelly in a bad way after awhile. Someone thought this was because it still contained some plant oils in it that went rancid, but we really don't know. In any case, this is the kind of thing you buy on sale since you know it won't last forever.

Dried Beans

Mixed Dried Beans with Cup and Shovel
Dried beans are great in the sensory table. They don't have any smell, but they do have a nice, smooth texture. We usually use them with scoops, shovels, and containers, similar to what we often use with sand. If you use funnels with beans make sure the hole at the bottom of the funnel is large enough for the largest beans you've used. We keep a large container of mixed beans at school, and it's fun to compare the different sizes and colors.

I don't know about other classes, but my two-year olds this year always add things to the sensory table over the course of a morning. We have an alligator who always makes it in, plus other animals, trucks, and kitchen implements often also join the party. The bottom picture was taken after my little helpers had their way with the table.
Dried Beans with Childrens' Additions

Wednesday, February 18, 2009

Sensory Footpath

Sensory Footpath Viewed From the Classroom Door
This week we set up a sensory footpath. We did this last year as well and it was great fun. For a backing (so it could be moved easily) we used a large banner made of something vinyl-like that was lurking in the school's office. Then we scrounged around for different feely things. This year we had a feltboard, a whiteboard, large bubble wrap, feathers on contact paper, sand paper, plastic grass on contact paper, plain contact paper, pearly clay, and LEGO boards.

We designed this to be walked on by bare feet. We don't have any footwear restrictions at our nursery school, but I know some do. We did have several children who elected to keep their socks on though and that was fine with us. I took off my shoes and socks so that the kids saw that this was ok. We also had several children who left their shoes and socks off for most of the morning.

Close-up of Feathers, Sand Paper, and Grass


    Some notes on construction:

  • Get help! I am contact paper challenged, and it took three of us to get it arranged and taped down (thank you, co-teacher and teacher from next door!).
  • Secure each item on all sides if possible. The plain contact paper, in particular, comes up when stuck bare feet are pulled from it.
  • Put all the shoes and socks in a bin or basket you can grab quickly in case your fire alarm goes off. This has never happened to us, but you never know!
  • Big bubble wrap is more fun than small bubble wrap because it's easier for little bodies to pop, especially when it's jumped upon.
  • We put whatever was available on the footpath, which made the cost for us zero. Don't spend tons of money on this path because it will be used in ways you can't predict (that's a good thing, but could get a little destructive).

  • Allergy note: If you add a gooey element make sure it's one that's safe for your classroom's allergies. I used something corn based since I knew the footpath would make its way to a classroom with a gluten allergy. Our backup option was to use play dough in our room, clean off the area of the path we put it on, and use that other classroom's rice play dough.


View of Sensory Footpath Toward Classroom Door

Tuesday, February 17, 2009

Lesson Plan for Week of February 18, 2009: 2 Year Olds

Sensory Table: Mixed dry beans and scoops

Gooey: None specifically, though we will have some gooey for our sensory footpath either a new recipes I found for pearly clay or regular play dough

Easel: Paint

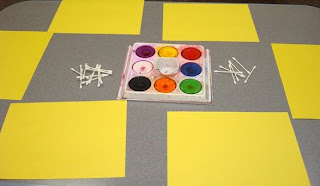
Art: Tempera cakes with q-tips Tempera Cakes in Tray, Q-tips, and Yellow Paper

Other: Sensory footpath with a variety of things to walk on. A bucket or basket for shoes will be kept by the back door in case we need to exit the building quickly.

Notes: We only have class one day this week because of President's Day on Monday. We are also going to get a new student. We aren't sure if there will be confusion or if it will all go smoothly.

Lesson Plan for Week of February 17, 2009: 3 Year Olds

Sensory Table: Soapy water with dishes and dish cleaning supplies Tuesday, Dolls for bathing for Thursday

Gooey: Pink play dough (gluten free)

Easel: Paint Tuesday, Crayons Thursday

Manipulatives: Linking people

Writing Table: Usual things Tuesday, scissors attached to table on Thursday

Other: If the sensory footpath survives my other class, we will use it here.

Notes: Thursday will be the first time this class has used scissors in the classroom. Typically scissors are a part of the classroom from the start at this age, but given the personalities in the class we've waited until now.

Sunday, February 15, 2009

Cold Bubbles

Pavement Bubbles
On a damp, cold day try taking bubbles outside. The perfect day is one where there's some ice on the ground and the temperature is hovering right at freezing. If you have a bubble maker of some kind, take it with you. Blow as many bubbles as you can right at the ground. The dampness and the cold let the bubbles "live" longer than usual and you can create an entire field of bubbles like this one, perfect for stomping.

Saturday, February 14, 2009

Aren't They All Teachable Moments?

I wanted to share with you something Lisa Murphy, one of my favorite early childhood speakers, put on her blog in November. Go read it and then come back. I'll wait for you. What did you think?

What I think is that it's a nice reminder that every moment in a kid's life is a teachable moment, it's just that we don't always need to be the ones doing the teaching. What is means is that when a kid finishes something at the easel we DON'T always have to comment on the colors or the choice of brush size. We can simply smile and enjoy it. It DOES mean we can keep our mouths shut when a child is absorbed in what he or she is doing, clear in the knowledge that they are doing their own teaching in their own moment. All we can do is ruin it and take out the wonder of it when we try to turn it into an official teachable moment.

As teachers of young children it is our job to create an environment that lends itself to teachable moments. We set up the classroom to learn about colors, smells, textures, and many other things simply so that we get the opportunity to use language about whatever topic we're thinking about. Even if we follow the childrens' lead and change what we're doing on the fly to follow their interests, we still feel compelled to prattle on and on while they (the children) are working.

Make a promise to yourself that for each child, at least once each day, you will simply observe. You may get the chance to bring up the experience with that child later and you may not. Enjoy their curiosity and their self absorbed activity. Yes, you will get to talk about color mixing and the alphabet. But not for every minute of every day. There's a time for everything. Let's remember that.

Monday, February 9, 2009

Window Painting


This great idea comes from my co-teacher. She originally thought to let the kids paint on the inside of one of our windows since in fair weather we let them paint on the outside. After thinking about it she decided to use our one-way mirror instead. She covered over the edges with newspaper and added a step. In the morning we added paper underneath the mirror because the step wasn't tall enough for every child to reach much of the mirror and we added a platform of large blocks just to make the standing area larger.
I suppose with some extra time we could have figured out how to rig up the paint on the wall (any ideas that don't involve damaging the wall?), but for today we simply put flat, wide cups of tempera paint out with various brush types. After the painting seemed to be done, we walked the children around to the other side of the mirror so they could see what their artwork looked like lit up from our classroom lights.
In the picture you're seeing the reflection of our room. I'm not sure who put up the fish hanging from the ceiling, but it's been a hit for years with the kids. It doesn't make for great photos, though.

Lesson Plan for Week of February 9: 2 Year Olds

Sensory Table: Coffee grounds with flowers, flower pots, trowels, and rakes

Gooey: Play foam (Monday); play foam or play dough (Wednesday)

Easel: Crayons on one side, markers on the other (Monday); Paint (Wednesday)

Manipulatives: Small play houses, people, furniture, vehicles

Other: On-way mirror painting (Monday only)

Because we wondered if the mirror painting might not be a huge, uncontrollable mess (it wasn't) we decided to go easy on other messy activities. On Wednesday this week we have our parent/teacher conferences, so we will have substitutes in with the children while we meet with the parents. For that we will also go easy on the messy stuff. We have some good messy ideas for next week, so no one will feel cheated!

Friday, February 6, 2009

Spreading With a Knife

Spreading may not seem like it qualifies as a real cooking activity, but it's something preschoolers see their caregivers do for them everyday. In addition to using the muscles of the hand and wrist that are later used for writing, learning to spread with a knife can give a preschooler a sense of accomplishment. After all, knives are grown-up tools.

Here's what you need:

- A spreader: butter knives, plastic knives with dull edges, craft sticks, and tongue depressors all make good spreaders. If you want to avoid the knives, go for a fat tongue depressor because it's a little easier to control in small hands. Kids know when it's not a real knife, so use something shaped like a knife if you can.

- Something to spread: apple butter, cream cheese, butter, nut butter of your choice, and hummus are all good things. For the first experience choose something very easy to spread, like apple butter or hummus. Anything that's spreadable is a candidate. Wacky stuff will get more attention and discussion.

- Something on which to spread: celery sticks, crackers, bread, toast, and muffins are just the beginning. As with the substance to be spread you can get really creative. For the first experience avoid things that will fall apart with a lot of pressure. If there's a food you want the children to try but you think it might not be a huge hit, use it as the base for spreading and you'll get more takers. When the kids prepare the food themselves they're more likely to try it.

- Something to hold the spread: You can put a dab of spread on a plate, but that's hard for first-timers to control. Consider using single-serving cups or even small drinking cups. A communal container is not recommended because of all the licking that's likely.


Allergy Note: Many of the things most people like to spread (like cheese and peanut butter) contain foods children may be allergic to. Tailor your foods to your class so that no one is left out.

Wednesday, February 4, 2009

Golf Tees, Hammers, and Styrofoam

We were trapped indoors today by frigid temperatures, so we pulled out one of the kids' favorite activities after snack instead of going outside: hammering golf tees into styrofoam. This might sound dangerous, but I've never seen anyone get hurt. For the two-year-olds styrofoam or play dough is about all they can hammer into, but once they get a little stronger they can hammer golf tees into things like pumpkins (a popular October activity in some classes).

Some kids like to hammer. Other kids like to pull the tees out. Others never try it. If you decide to keep the materials on hand like we do, make sure you pull out all the tees before putting it away. There's nothing more frustrating than going to get the styrofoam and finding it's not ready.

I believe most of our styrofoam comes from packaging material brought in by staff and families. We keep a box with tees and wooden hammers in it available in the supply room.

Monday, February 2, 2009

Snow


If you've got snow outside, bring it inside! Sometimes being outside for any length of time is too much for the really young set. Let them bring their mittens into the classroom to play with the snow if their hands get cold.

Snow is really pretty if you add color (I prefer liquid watercolor but some like regular paint). You can even let the kids paint the snow with brushes or use squeezebottles to add color. Of course, snow is also pretty just on its own, no color required.

You can investigate temperature by providing small squeeze or spray bottles filled with very warm water and other ones with ice water. This activity can be contrasted with when you do the same thing but with large blocks of ice. Or you can add the large blocks of ice (make them yourself with containers in the freezer) at the same time as the snow to do an instant comparison.

Typical things to put in snow are shovels and small buckets or artic animals. But you could also put desert animals or bugs in the table and build a whole learning day about habitats with that simple contradiction, particularly with older preschooolers.

Puffy Paint

Here's a recipe for an easy puffy paint.

- shaving cream
- white glue
- liquid watercolor

Every teacher I know has a slightly different proportion of shaving cream to paint. I add them until it feels good to me when I stir it. The watercolor is added after you like the way the white mixture turned out.

Yes, you can paint with just the shaving cream and the watercolor, which we also do. Adding the glue prevents the shaving cream from disappearing into nothingness when it's dry.

Lesson Plan for Week of February 2, 2009 2 Year Olds

Sensory Table: Snow, which later had paint added by a creative child

Gooey: Clean mud on trays (it was in the sensory table for one day last week)

Easel: Puffy paint on black paper with chubby brushes

Art/Manipulatives: Tempera cakes with water added directly to the cakes already, chubby brushes, large pieces of light blue paper

We took advantage of the snow outside to bring some inside. We started with shovels and the like in the snow. By the end of the morning we had large plastic animals, some trucks and bulldozers, and at one point someone put a baby doll on top of a snow hill. When the first child came in I asked him if he's like me to add color to the snow. He said yes. Since I was thinking liquid watercolor I headed for the cabinet in the room where we keep it. He, having never seen a tempera cake before in his life, loaded up a brush with color and proceeded to paint the snow. It looked beautiful.