Showing posts with label Play Recipes. Show all posts

Wednesday, July 22, 2009

Do It With Lemons!

I just had to post this link here, since it’s related to all the baking soda and vinegar stuff I’ve been blogging about.  If you don’t like the smell of vinegar, do it with lemons instead and clean your counter at the same time.  Brilliant! 

Baking soda, dish soap, and lemons at Education.com.

Technorati Tags: ,

Wednesday, July 1, 2009

Baking Soda and Vinegar with Twos

Setup for Twos

Here’s how I like to set up experimentation for my two-year olds. I use trays on a low table. I spread baking soda on the tray and then fill small squeeze bottles with vinegar.

Tips:

  • Keep the tops on the squeeze bottles twisted down low so it doesn’t all pour out so fast that the joy is gone immediately. Then it becomes more about pouring rather than observing the reaction.
  • Have a funnel that fits in the top of your squeeze bottles handy for refilling the vinegar. Unless you have an unlimited supply of bottles you will be doing this A LOT.
  • Put some dish soap in the squeeze bottles. Not only does it make the vinegar come out a little more slowly but it makes the reaction slower. The Trays Get a Bit Wet
  • Put a little liquid watercolor in the squeeze bottles. I just use primary colors. This way you have something to talk about with the kids who aren’t impressed by the bubbles.
  • Have more baking soda standing by. When the bubbles stop but there’s still vinegar left, you can add more. You may need to dump the trays periodically.

If you do this outside then cleanup is a breeze. Just dump the trays outside and clean them with the hose (or let the kids do it). You can also do this activity in the sensory table, but for some reason there seems to be more squirting in eyes at this age when you do it there.

Scientists at Work

Need a refresher on the chemical reaction itself? Baking soda + vinegar = water + carbon dioxide + sodium acetate (more or less).

Tuesday, May 12, 2009

Cornstarch Goo (or Gel, if you don't like to say Goo in polite company)

Hot Goo Here is something that stewed in my brain for awhile before it became a reality.  At the NAEYC 2007 conference I heard someone talk about putting paint in between two layers of contact paper to provide a squishy surface for kids who don't want to touch gooey things.  But try as I might, I couldn't get it to be at all fun or interesting.  I wanted something larger than a zip bag that I could put on the easel or over our small square table.  I tried adding things to the paint to make it thicker.  I tried putting it on paper and then using one layer of contact paper on top of it.  But it was boring.  Nobody liked it.  Even I thought it was lame.  (If you've done something like this, please share the secret!)

Our music teacher suggested I try some sort of gel.  We use hair gel in small squishy bags, but you're somewhat at the mercy of hair gel manufacturers when it comes to color and you can't always get hair gel in large quantities at dollar stores when you want it.  The music teacher suggested corn starch but didn't know what proportion of water to corn starch would be best.

Then I came across a similar idea in The Toddlers Busy Book.  The recipe is very simple:

3 cups cold water
1/4 cup corn starch

Combine the water and corn starch in a cold pot or pan.  Stir constantly while heating and remove it from heat just as it beings to boil.  Allow to cool before storing.

Cool Goo Wow.  Super simple.  It looked smooth and creamy, like pudding, while it was still warm and then got more like gelatin as it cooled.  Once it was completely cooled it was as though I had made some soft gelatin and then mixed it.  It wasn't pretty, but it definitely looked like it had potential.

Now, what to do with it?  I used it two different ways, which I'll talk about on Wednesday and Friday.  Why the secrecy?  I want YOU to tell me your ideas.  If someone handed you cornstarch goo, what would you doo?

Allergy note: This recipe contains corn, which makes it inappropriate for students with a corn allergy.  If you put it in squishy bags it might be acceptable, but check with parents first.  There's always the risk that the bag might leak.

Saturday, May 2, 2009

Frosting Play Dough (No-Cook and Gluten-Free!)

Making Frosting Play DoughWe usually use play dough that teachers make at home because of the heat required (older classes will use an electric skillet in the classroom, but remember that I'm working with 2s and 3s here). But sometimes it's nice to make some no-cook play dough with the kids. It doesn't last as long or feel as smooth as the kind you cook, but we recently made some that felt just like frosting. And who wouldn't want to play with frosting? Oddly enough, not one child tried to taste it, which is more than I can say for our usual play dough antics.

Ingredients:

- rice flour (roughly 3 parts)
- salt (roughly 1 part)
- vegetable oil, a glub or two
- water, until it feels good
- liquid watercolor, until you think it's nice to look at

We started with the ingredients in a bowl with some spoons for mixing, but after awhile we just dumped the dough onto the table. The kids could ask for more flour or water and we'd give them some in a small container to add as they saw fit. This particular class is known for dumping, so large quantities of ingredients would have been gone within seconds.
Starting Dough in a Bowl
This small project kept most of the class busy for about 20 minutes and around half of them busy for 45 minutes. After awhile even the calls for more water or rice flour died down. We eventually brought out some objects to use with the dough, but most of the time was spent simply manipulating it.

Many parents and teachers are surprised to learn that traditional and most commercial play doughs have wheat flour as the base. You can buy gluten-free dough, but it's expensive. Rice flour is more expensive than wheat flour, but it's cheaper than buying commercial gluten-free dough. Since the rice flour is very fine you get a different texture than with traditional dough. One teacher's husband at my school is a food distributor, so this year we have been able to get our rice flour at cost.

I highly recommend finding a source of alternative flours, particularly soy and rice, even if you don't have gluten-free students. We have a cooked dough recipe that uses rice flour and is just divine (a post for another day). I've never felt anything like it made with wheat. Different flours make different textures. Even whole wheat flour is a nice addition if allergies aren't a concern.

Wednesday, April 1, 2009

Pearly Dough

Clean Pearly Dough Ready for Playing
I found the basis for this play dough recipe in Glues Brews and Goos by Diana F. Marks. I had to change the size of the recipe as well as some of the instructions because I had a lumping problem. I didn't get any pictures of my smooth batches, so you'll have to use your imagination. The last picture in this post is probably be best one in which to see the lumps, if you're into that sort of thing.

The original title is "Pearly Clay," but I couldn't get it to a clay consistency. Also, though the original recipe says it hardens well, I didn't find that to be exactly true. But this is a fun dough because it's a bit translucent.
Glitter Makes It Better
You need:

2 cups salt
2 cups boiling water
1 cup cold water
2 cups cornstarch

1. Combine the salt and boiling water. Allow to cool (this is important to avoid lumps).
2. Combine the cold water and cornstarch.
3. Combine the salt and cornstarch mixtures in a pot, stirring constantly over low heat until it reaches a stuff cookie dough consistency. Allow to cool.
4. Knead the dough until it's as smooth as you like it.

I found it very hard to mix the cold water and the cornstarch. For those of you Oobleck fans, it's stiff Oobleck. If you have the same problem, use less water for the salt and add it to the cornstarch.

You can add liquid watercolors to this dough for a nice effect. Glitter is fun too.

Allergy Note: This recipe contains cornstarch, so it is not to be used in a classroom with a corn allergy.
Here There Be Lumps

Sunday, March 1, 2009

One Way to Use Shaving Cream

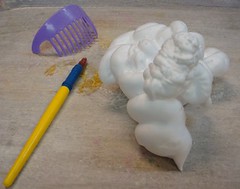
Small Hill of Shaving Cream, Brush and Comb
Shaving cream is a staple for early childhood education. Its soft, foamy texture is fun to feel. Some kinds have a distinctive smell. A child can experiment with finger movement and learn how to operate a can, which takes a lot of muscle strength in a concentrated direction.

There are many, many, MANY ways to use shaving cream. In fact, I've already talked about it on this blog when I wrote about making puffy paint. I'm sure I'll talk about it again another time. This post is just about one way.

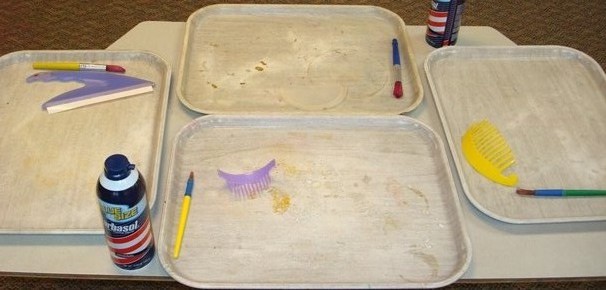
I like to put shaving cream on trays on a table. This helps to define space for kids who are sensitive to having others play with the same material. I like to provide art brushes for those who don't want to touch the shaving cream as well as comb-like objects that make a pattern when they're dragged through the shaving cream. Most kids won't wear a smock but I have them nearby anyway.

Table Setup for Shaving Cream on Trays
While I usually start with some shaving cream on each tray (one or two in a flat design, another one or two with a small hill) I also let kids add more shaving cream on their own. Typically this involves leaving the can on the tray while they push down with all their might to get some out. Some kids will spend their entire time just spraying more out of the can, and that's ok. Shaving cream is cheap, the time and ability to practice with those muscles is priceless.
Shaving Cream on Tray with Brush and Squeegee

Saturday, January 31, 2009

Clean Mud


Clean mud is interesting. Some kids seem to ignore it, but a few like to use it. I've noticed that sometimes older kids get really into it. Last year one of the pre-K classes turned some clean mud into a volcano. Depending on how you make it, it can behave like clay or mush.

The recipe is very simple:

1. Grated soap (Ivory is typically the brand mentioned in recipes for clean mud)
2. Toilet paper, torn up into small bits (Charmin supposedly is best but I've done it with whatever's on hand)
3. Warm water (warm water helps the soap dissolve better than cold water)

You can add as much of these ingredients as you like. As it dries it will harden. If it gets too hard, add more water. Remember NOT to clean this up by putting it down the drain. The toilet paper will clog pipes.

Saturday, November 3, 2007

Gak

Everyone has a Gak-like recipe in their repertoire. This makes a gooey white substance that flows slowly or can shatter if hit fast. It can be molded like a play dough but immediately starts to soften and lose its shape. We pass this recipe out to parents all the time and I couldn't find a copyright statement on the web, so I'm assuming this is free. Please correct me if I'm wrong.

Some activities for Gak include:

- Place the Gak over things with holes on a table, such as slotted spoons, berry baskets, or other objects you can easily wash.
- Use the Gak with plastic knives and cookie cutters to form slowly "melting" shapes.
- Let the Gak settle in a large, shallow pan and let children write on it with markers.
- Let children write on the Gak with markers and then play with it to see what happens to the colors.
- Suspend a holey basket, like a berry basket, from the ceiling above a table. Let the children cut the Gak with scissors as it slowly droops to the table.
- Have the children help make Gak. You mix the Borax into the warm water and let the children pour small amounts of it in the glue mixture. Give each child the lump they created to play with on a tray.
- Let kids add glitter or small glitter shapes to watch where they go as the Gak is moved around.

Recipe:
2 cups Elmer's glue
1 1/2 cups cool water
1 tbsp Borax
1 cup warm water
food coloring or liquid water color

Mix the glue and cool water in a large bowl. Dissolve the Borax into the warm water in a measuring cup. If you want to color the Gak add the coloring to the Borax mixture. Add the dissolved Borax to the glue mixture 1/3 of a cup at a time. Stir with each addition, pulling out the lumps as they form. Work in the excess liquid with your hands and then knead into a lump. Store in a sealed container.

Tips:
- Use Elmer's glue. I've made this with other brands and it's a bit stinky. If you plan to make this up a few days before you use it and it sits in a container, the non-Elmer's version really smells. Even some kids won't go near it.
- The color mostly stays with the warm water, so you can get multiple colors out of one batch if you separate the Borax solution into as many parts as you want colors. Do your lightest color first.
- Advise parents to wash Gak-y clothing as soon as possible. While it is possible to get set-in Gak out with muliple washings, or freezing and picking, it's a whole lot easier to clean it up front. Same goes for teachers. :)