Tuesday, March 31, 2009

The Character Dilemma

In our school we have a "no characters" policy. What this means is that for areas over which the school has control we do not have licensed characters. For us, it means there are no character toys, books, decorations, or other items. No Dora, Pooh, Elmo, Franklin, Fancy Nancy, or anyone else. This policy does not extend to children and families; children can wear character clothing and parents can bring in snacks sporting licensed characters.

There are many reasons for the "no characters" policy. One of the most important, from our view, is that a character limits the parameters of play. It's not as imaginative to act out a tv show or video as it is to create the setting and rules cooperatively. It also prevents children from practicing the social give and take that's required from purely imaginative play. Those are critical socials skills that lead to success in the elementary grades and beyond.

Here I'm going to quote something from Buy, Buy Baby: How Consumer Culture Manipulates Parents and Harms Young Minds by Susan Gregory Thomas (a book I wish I'd had before I had kids). Backed up by research cited elsewhere in the book, she says, "the main thing that infants and toddlers learn from such characters, whether on television, juice boxes, or bed sheets, is the ability to recognize them -- which should not be confused with actually learning anything 'educational.' "(p. 143) What she's saying (and that's backed up by research) is that kids don't learn anything from these characters other than to recognize them and later want them because they're familiar. That's right, they don't learn new behaviorial skills or even much in the way of academics. What they do learn children are unable to apply outside of the story on tv without significant adult interaction. So, when these characters are available in the classroom it amounts to free advertising and a tacit approval of commercialism over education. I don't know about you, but if I'm going to advertise something I want to get paid!

Children who spend time watching shows and playing with character-limited toys are not only not learning the important social lessons that they need to learn, but they are not spending as much time on more developmentally appropriate and "educational" activities. Characters are part of our culture that isn't really helping our kids get ready for school. In the case of things like Hannah Montana and High School Musical in preschool, they send the message to young children that they are allowed to behave like teenagers. I don't have anything against those pieces of entertainment and I personally think they have some good qualities, but I don't want a 4-year-old child to get the impression that the sort of behavior displayed by those characters is appropriate for him or her now.

Now don't take me for a character hater. I've watched my share of Little Einsteins, Dora, and Sesame Street. I've been known to say, "seatbelts buckled, everyone?" in my best Ms. Frizzle impersonation. I've got a fairy/princess lover for a daughter and a LEGO Star Wars obsessed son. But I don't do characters at school. And I'm cool with that.

Monday, March 30, 2009

Colored Masking Tape Art

Child with Masking Tape
Kids love stickers, but those often sport characters (a no-no at my school). Guess what? They love tape, too! At the easel or around the edge of a table covered in paper I set out small bits of different colors of tape. 2s often need an adult to show them that they can take the tape off the side of the table and stick it wherever they like. 3s usually have an idea of what to do or they figure it out on their own. I also usually leave a few rolls of tape out for those who want to try ripping or cutting their own pieces. And if you have someone who is really, really desperate for stickers, you can cut tape into little squares or rectangles and put those bits on wax paper for the whole sticker procedure.

Once the tape art is complete, kids can take it home right away. No drying time! If tape is old hat, have them cover their tape with paint, markers, or crayon. Then, lift off the tape to see what happens. Now have art using the resist technique and you can talk about positive and negative images and space.

You really can never have too much masking tape, or have too many colors, or have it in too many sizes. My own children like to use it to wrap small toys with paper into "presents" for me. It's very sweet, and they get practice with three dimensional art. They also like to completely cover a paper towel tube and call it a telescope for imaginative play.
Masking Tape at the Easel

Friday, March 27, 2009

Sand

Sand in the Sensory Table
I know, huge surprise! Sand in the sensory table! Since many people refer to it as the "Sand and Water Table," sand is a natural, either dry or wet (we mostly do our wet sand outside, but we have big sand pits where we can do that).

What do you like to put in your sand? Classically, you have shovels, cups, and maybe some scoop-type objects. You could also take the thematic route and put certain kinds of animals (desert, woodlands) with appropriate landscaping props in the table with sand.

Then there are the pouring gadgets with things that spin or dump when enough sand is poured in at the top. Don't forget funnels, small cups, and random things you find around that you think have no purpose until some child finds them to be the perfect things to play with in the sand.

Wednesday, March 25, 2009

Grocery Shopping

Grocery Store
One of my fellow teachers asked the parents in her class to bring in clean boxes and containers of things they purchased at a grocery store. They got a deluge! The packages have been making their way around the building and this week it's our turn.

An entire toy shelf was dedicated to grocery items, with toy fruits and vegetables put in short bins on a table to look like the produce section. We had several cash registers, shopping carts, and lots of paper shopping bags. Two of the shopping carts have pretend infant seats, so of course several children brought their "babies" along.

My 3s this year are a little younger than the last time I taught this age, so they mostly did shopping only. Older kids will take the shopping over to the play kitchen to put the groceries away and maybe make a meal. Also, this group of children didn't play with each other but relied upon the adults to ask them what they would do next. In the past the children have gotten so involved taking on different roles (cashier, bagger, parent, etc.) it was fun to watch. It was much more hands-on for the adults this year.

Allergy Note: For the most part this is an allergy friendly activity, but if you have a severe allergy in your class you might consider removing any packages that once contained the allergen, such as peanut butter for a peanut allergic child. You could also wash the outsides of all the containers and then seal them shut, but I guarantee SOMEONE will try to get them open no matter how much tape you use.
Fruit and Vegetable Stand

Monday, March 23, 2009

How to Make Easy Felt/Flannel Board Pieces

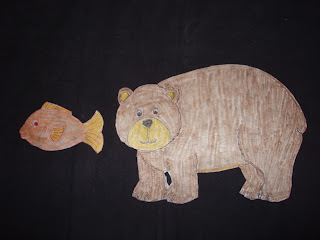
Flannel Board Pieces for Brown BearI like using a felt board to tell stories, particularly with 3s and up. Actually, mine's a flannel board because I couldn't find large enough felt. The ones at school are made of some material I don't recognize. But it's all the same thing.

Unfortunately, I have trouble finding good pieces for the board. Sure, I can cut out geometric shapes to let the kids explore, but we don't have a library of felt board pieces for storytelling where I work. So I have to purchase or make anything I want to use. When I priced some sets I was a little shocked. A few years ago I made some pieces out of laminated paper backed with hook and loop tape. It worked, but I didn't think hard enough about storage and some of the pieces got lost before their second outing. I'm not very artistic or crafty, so making more pieces seemed too daunting and I dropped it. Plus, I'm a little scared of the school's laminator!

Recently, I decided to try again. In the book 2'S Experience: Felt Board Fun (2's Experience Series) I found a reference to something called Pellon. It turns out that this is a brand name for interfacing, which is used in sewing and crafting. It also turns out that you can buy versions of interfacing that are thin enough to use for tracing line art AND it sticks to felt. It's not terribly sturdy stuff, but I wanted to make pieces for me, not for the kids.

Using the art in the felt board book, I started work on pieces for Brown Bear, Brown Bear, What Do You See? After copying the art (a really important step since my ink went straight through the interfacing onto my copy) I traced it with permanent markers. Using fabric markers I colored in the pieces, stuck them in the drier to set the fabric marker color, and cut them out. Almost instant pieces!

Are they professional quality works of art? No, not really. But they work. And they're cheap. They didn't take all that long to make, which is key for me. Next on my list of things to try is to make some slightly sturdier pieces (something I think will involve fusible interfacing) and a felt board with storage. I've seen references to being able to print from a printer directly on interfacing, but I was unable to find out specifically what kind of interfacing other than the expensive stuff in small packages sold for that purpose. If I have any luck I'll let you know!
Brown Bear and Gold Fish Say Hello
Do you want some printable instructions for making these felt board pieces? I thought you would. I've put the instructions, complete with photos for each step, here at Instructables. I highly recommend the Instructables site for all kinds of ideas. It's the first time I've written an Instructable, so let me know what you think.

Thursday, March 19, 2009

Pom Poms, Clothespins, Cups, and Tubes

Pom Poms, Tubes, and Clothspins
What a mess, right? Here's a shot of our sensory table with pom poms, clothespins, and tubes in it. Seems a little strange, but kids like to use the spring-loaded clothespins to pick up pom poms as well as attach them to the tubes. They also like to run the pom poms through the various sized tubes, noticing which size pom poms will fit through which tubes (so have a variety of sizes of both).

I usually do this activity on a table as a manipulative. In that case I often remove the tubes and use recyled containers. Kids clip the clothespins on the sides of the containers and use the clothespins to put pom poms in the containers. Some kids focus on just one of the items, while others may combine two or more.

Allergy Note: If you are using recycled containers, be sure they didn't contain an allergenic food for one of your students. If they did, confirm with the parents what kind of cleaning is acceptable, if any, before you use those containers.

Tuesday, March 17, 2009

Painting With Cars

The Set-Up for Car Painting
Painting with cars is fun, and since it's community art you don't need to sort it all out later to get it to the right family (not that I don't want them to have art, I'm just lazy sometimes). All you do is cover a low table or an area of the floor with paper, put out trays of paint, select some cars you don't mind getting painty, and let them at it.

I like to pre-select cars with interesting textures on their wheels and cars with wheels that roll easily. Choose cars with different sized wheels so you can compare them. If possible, find some vehicles that have different numbers of wheels, like trucks, so you can see how the paint lines are different. Cars you can clean later are a must, and if you have any concerns that inappropriate vehicles might make it to the painting area you might want to remove them from the room during this activity. You don't want to spend your time policing, you want to spend your time wondering at all the different marks the cars, trucks, and other random vehicles are making on the paper. Any car I've left in the room is fair game, so if children bring over extra vehicles I let them try regardless of the vehicle's size.

In the photos here we added a road with masking tape (we would have made it more road-like, but we could only find dark blue tape at the time). We have one little boy who likes to run his vehicles in a defined space. If there isn't one available, he'll make one by moving toys off shelves so he has a straight space or putting books down for a road. I didn't expect other kids to use the road, but they did. As you can see, they went around and around, occasionally stopping for more paint but mostly just running the vehicles around. When it was time to clean up for snack all the cars were lined up and ready to be "driven" to the sink for washing.

A Line of Painty Cars

Monday, March 16, 2009

Book Review: Bubbles, Rainbows and Worms

Bubbles, Rainbows, and Worms: Science Experiments for Preschool Children
I've just finished reading Bubbles, Rainbows and Worms: Science Experiments for Preschool Children, by Sam Ed Brown. I am really impressed by the simple layout and the fundamentals on which this book is based. This is not a book with detailed lesson plans for extended projects, though there are ideas for multi-day explorations. You get a list of the materials you need, what to do, and why you're doing it all in a clean format.

Right away you know that this book is just a little different than other books with a lesson-plan focus. Brown says on page 10, "To be honest, we do not really teach children, we provide an environment that encourages and allows children to teach themselves." When talking about exploring gravity on page 48, Brown reminds us, "We can lay the foundation for future understanding." THAT, my friends, is what preschool is all about. We're not creating kids who know everything, we're creating kids who are capable of learning anything when they're ready for it by providing a good foundation.

What I really love is that almost all of the activities are one page exactly. So, if you feel like you need to make a copy of something in order to protect the book you don't have to worry about multiple pages flapping around. Also, each activity has a section on how to explain the scientfic concepts. There is a focus on conservation and on frugality, so most of the activities require things I can easily find around my own house or in our school's supply room.

This book is geared toward the 3-5 crowd, though I could see plenty of things I can modify for toddlers. For example, we were already planning on doing a "dark day," but I'll be adding the "Sillhouettes" activity on page 37. I found several examples of things I could set up in my classroom for the toddlers and 3s to explore at their own pace.

I found this book at my library, but if I had to spend the money on it I probably would. I only wish, as I often do for activity books, that the binding was a spiral one. Then I wouldn't feel like I had to copy pages in order to keep the binding from breaking.

Friday, March 13, 2009

Rain Activities

Pie Tins for Rain Music
Every good children's activity book has a section on rain or what to do on rainy days. Sadly, sometimes the advice is for activities you can do inside until the rain stops. But why? Unless it's thundering or very cold, go outside! Parents often don't want to deal with the wet children who eventually come back into the house, so consider it YOUR responsibility to get kids to experience rain. Yes, that means you have to bring your rubber boots to school.

No matter what the weather, I always keep a few quick activities in my classroom cabinet in case of rain. The most fun is aluminum baking tins. I've had the same ones for several years now. They make a great sound, and different sizes make different tones. Even if you don't go outside, kids can hold the tins out the window or the door to make rain music. Our school's music teacher has talked about making a musical rain instrument out of food cans, so clearly that's another thing to try.

The second thing I keep is dark construction paper to make rain art. This only takes a few seconds, and the children can look at the design the rain made while watching it evaporate. Then they can do it again with the same paper.

Colored Rock Salt in the Rain
The third thing I like to have on hand is something crystalline, like salt or sugar, that will partially dissolve in the rain. It's helpful to put some colored paper on a tray of some kind and use that to hold some crystals. In this picture I've use some colored rock salt that our co-director made a few years ago. We discovered that the large rock salt didn't really dissolve well, but the color did. The kids chose the background paper color. If I had known the rock salt wouldn't do much I might have chosen something lighter.

Speaking of paper and trays, put some paint or watercolor on some light paper, stick that on a tray, and plop it outside for a bit. You'll get some interesting effects.

But please, please, don't stay inside! Put on your boots and go splash in some puddles. Make mud pies. If it's warm enough and the kids have bathing suits, give yourselves some mud facials. Collect the rain and measure (by height, weight, or volume) how much has fallen. Try to track animals, birds, and insects in the rain. Where are they? What does the rain sound like on a raincoat hood? Is it different than the sound on a baking tin? What words can the kids use to describe the smell of the air while it's raining? What about afterwards? Can they tell the air is full of moisture? How? Wonder with them about the rain and you'll be looking forward to each and every rain shower.
Rain Art with Tempera Paint

Thursday, March 12, 2009

Spool Painting

Spool Painting
Teachers with whom I share a room left this activity for me one morning as a nice gift. Actually, they left spools on chenille stems and narrow margarine containers. It should have been obvious to me, but I was so tired I had to ask another teacher who happened to walk by what it was for!

Simply string one or more spools onto chenille stems. Dip them in paint, and roll them on paper or whatever you like. While you can use a shallow container to dip the spools in, if you'd like the whole spool submerged you'll need something deeper. I think the kids spent just as much time dunking as painting, and the clear margarine containers were so interesting some kids just wanted to watch the paint slosh around inside them.

I later came to find out that we have a box labelled "spool painting" in our supply room. All I can say is, man, do we have a lot of supplies!

Tuesday, March 10, 2009

Beware Notes Left By Other Teachers

Gak Dripping From a Small Crate
We made Gak yesterday in class. Besides being way fun, it was also a reminder that just because someone leaves a note it doesn't mean it's for you. Some nice person had taped a recipe for Gak inside our cabinet door. It had all the right ingredients, so I went ahead and used it. It became clear right away that not enough goo was being produced in the glue mixture.

Well, the ingredients were right and the proportion of Borax to hot water was right, but the total amount of the Borax solution wasn't correct in relation to the glue and water mixture. Luckily, this is an easy thing to diagnose and fix, even with a bunch of 2-year-old helpers. But it was a good reminder for me that if I haven't actually followed a particular set of instructions it may not be what I planned on.

The good news was that I was able to demonstrate (mostly for the adults in the room) that you can color the Borax solution with liquid watercolor and the color sticks with the goo and doesn't go into the glue mixture. This makes it easy to have several colors of Gak from one batch.

As you can see from the photo above, this was fairly liquidy Gak. It was loose enough that the little ones could see it move through the crate. Usually it's too slow for the younger ones to wait for it. They're more interested in using cookie cutters with it or drawing on it with markers.

So, for those of you without a Gak recipe, here it is again:

2 cups Elmer's glue
1 1/2 cups cool water
1 tbsp Borax
1 cup hot tap water

Mix the glue and cool water in a large bowl. Dissolve the Borax into the hot tap water. Add the dissolved Borax to the glue mixture 1/3 of a cup at a time. Stir with each addition, pulling out the gooey lumps as they form. Work in the excess liquid with your hands and then knead into an oozing mass. Store in a sealed container.

Monday, March 9, 2009

IAEYC 2009 Conference

I'll be going to the IAEYC 2009 Conference in Indianapolis April 3-4, 2009. I'm so excited! I haven't been to this conference in two years and it looks like there are quite a few sessions that will interest me. Just as I did with the last conference I attended, I'll write up some notes from the sessions I go to. See you there!

Sunday, March 8, 2009

Biscuits

Preparation for Biscuit Making
I asked in the jam post what we should put our jam on. Biscuits! Biscuits are great for young kids. Despite the mythology surrounding the perfect biscuit, it's pretty hard to mess them up. You can mix them by hand or by spoon, and you can tell personal family stories if you're from a biscuit-making family. You might also ask parents to contribute stories if you're from an area of the country that's likely to have biscuit makers in every family.

Sadly, I am not a biscuit maker. I only made my own biscuits for the first time a few weeks ago. My co-teacher, on the other hand, makes them regularly. For class I think she used the recipe from Joy of Cooking just to be sure that the scaled-up recipe would work. As with our other cooking, we had a big bowl and lots of mixing opportunities. My co-teacher brought in her biscuit-cutting glass from home, which was a novelty to many children. I would have used a cookie cutter, which shows you what I know.

With the little kids we didn't bring them into the kitchen with us. The kitchen in our facility is an adult place and is often being used for functions while school is in session. The older children regularly go to the kitchen, but they're tall enough to see things. Sometimes I will take one or two children to the kitchen with me to watch me put things into the oven or take them out, but so far we haven't brought the whole class of two-year-olds into the kitchen with us.

The biggest challenge with this type of cooking is keeping track of hand washing. Many children helped, then went to play for a bit, and then came back. Each time they came back we helped them to wash their hands. This is why having two teachers and a parent helper each day is such a good thing!

Allergy Notes: Usually, bisuits require both milk and butter, which can can problematic for milk-allergic children. Soy margarine (I use Earth Balance brand) works for the butter. For the milk you can substitute soy milk or rice milk. I imagine nut milk would work as well, but they aren't allowed at our program. Clearly, biscuits are not gluten free. I'm hoping to do some gluten-free baking with my other class, so hopefully I'll have a solution for that in the future.

Friday, March 6, 2009

Strawberry Jam

My Ancient Bread Machine

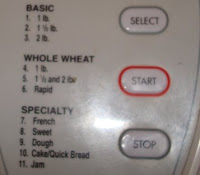
Did you know that bread machines can make jam? Look at the picture of my ancient bread machine keypad. Way down at the bottom, #11, is "Jam." My co-teacher noticed this first on her bread machine (almost as ancient) last year. Not only that, but her instruction manual actually had a recipe for strawberry jam in it. You can see where this is going.

So...yes, we make strawberry jam with 2-year-old children. It's fun. They get to cut with plastic knives.

You can easily find a recipe on the internet, and most of them only have strawberries, pectin, sugar, and lemon juice in them. Here's what we've learned the last two times we've done this.

  • Wash the strawberries and cut off the tops before the kids come to school.
  • Let them cut the strawberries as best they can. There will be a lot of mushing. This is ok, it's all going to get mushed anyway.
  • If you use packaged lemon juice, DO NOT let anyone squeeze it directly into the machine. Measure it into a cup first. Go ahead and laugh, but I bet you know why I say this!
  • Put the bread machine on the floor so that kids can look inside while it's mixing. It will heat up at some point, but the beginning of the cycle always involves mixing. It's also a good way to practice approaching appliances slowly to feel how hot they are before touching.
  • On that last point, you might want to do a test to see how hot your bread machine will get on the outside. Neither of ours gets terribly hot, so even if someone touched them without going slowly there wouldn't be any burns. I've seen other machines that do get very hot. That's not a good choice for school.
If you live in an area where strawberries grow, it would be ideal to go pick strawberries and then use them in jam.

One downside of the whole jam-making thing is that the jam has to refrigerate to be completely set. Some of the younger ones may not remember that you even made jam if a few days go by between when you make it and when you eat it. If your class can visit the refrigerator when you put it there and when you get it, all the better.

Oh, and while you're enjoying your jam, why not read Jamberry, by Bruce Degen? Sometimes the twos will only pay attention to the words in a book while they're eating, so what a perfect opportunity.

What do you eat your jam on? That's another post for another day. But please let them use knives to spread their own jam!

Wednesday, March 4, 2009

Cutting With Knives

No, I don't really have a knife "thing." I just think it's important for kids to have the opportunity to practice with the kinds of tools they see in their everyday lives.

In this case, I'm talking about knives again. I've talked about spreading things with knives and now I want to talk about cutting with them.

So, what kinds of knives can children cut with? I'm partial to plastic knives, which have just enough of an edge that they can cut soft things but aren't so sharp that they're likely to cause terrible damage. Yes, you can cut yourself with a plastic knife. I've done it myself. But this is why we talk about safety with the kids. Another choice is a knife similar to the safety pumpkin knives you see at Halloween each year. I have a co-worker who buys them from a local farmstand to keep in her pre-K classroom at all times. You never know when someone will have a need to cut stuff, after all.

What kinds of things can kids cut? Just open your fridge. Strawberries are an obvious one. Mushrooms are easy. Things that you can first cut into strips for the children to then cut into small bits are great. At home my kids will cut green pepper, eggplant, and zucchini this way. Too bad they won't eat any of those things! Here's a partial list of foods to cut, but I'm sure you can come up with many more ideas:
  • cooked eggs
  • red peppers
  • cheese
  • bread slices (maybe for croutons or to take the crusts off)
  • celery
  • strawberries
  • mushrooms
  • zuccini or summer squash
  • grapes
  • apples or pears (cut into slices first)

You see, the list could go on forever. So get cutting!

p.s. If someone in your class or your house really wants to try cutting that big pretzel rod (or something else really crunchy or hard) with a plastic knife, let them. They can't learn if they don't try, but you might want to stand close by to supervise. Do feel free to talk about things we don't cut, like non-edible parts of the room, clothing, and furniture.

Allergy Note: As a general rule, if a person can't safely eat something, he or she shouldn't be asked to prepare it in any way. If you have food allergies in your class, make sure there is something safe for the food allergic student to cut that can still be included in whatever you're cooking and that it won't come in contact with allergenic foods before the food allergic person handles it.

Tuesday, March 3, 2009

Painting With Feathers

Feathers At the Easel
I credit the ladies who share the room with us on alternate days for this idea. While I'm crazy let's-get-messy girl with other parts of the room I tend to be more conservative in my easel choices, mainly because the easel often gets ignored while other things are going on.

This idea is very simple: paint with long feathers for brushes. We only had a few kids try this, but the ones that did kept coming back for more. The resulting art looks vaguely like asian character painting.

Sunday, March 1, 2009

One Way to Use Shaving Cream

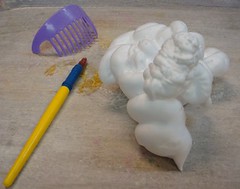
Small Hill of Shaving Cream, Brush and Comb
Shaving cream is a staple for early childhood education. Its soft, foamy texture is fun to feel. Some kinds have a distinctive smell. A child can experiment with finger movement and learn how to operate a can, which takes a lot of muscle strength in a concentrated direction.

There are many, many, MANY ways to use shaving cream. In fact, I've already talked about it on this blog when I wrote about making puffy paint. I'm sure I'll talk about it again another time. This post is just about one way.

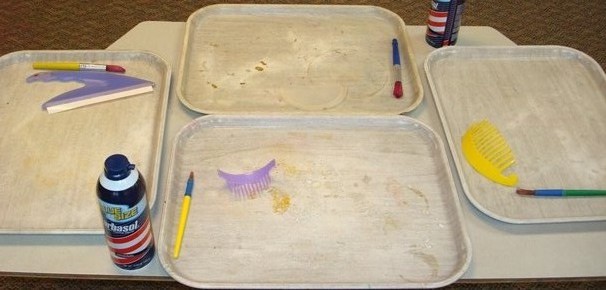
I like to put shaving cream on trays on a table. This helps to define space for kids who are sensitive to having others play with the same material. I like to provide art brushes for those who don't want to touch the shaving cream as well as comb-like objects that make a pattern when they're dragged through the shaving cream. Most kids won't wear a smock but I have them nearby anyway.

Table Setup for Shaving Cream on Trays
While I usually start with some shaving cream on each tray (one or two in a flat design, another one or two with a small hill) I also let kids add more shaving cream on their own. Typically this involves leaving the can on the tray while they push down with all their might to get some out. Some kids will spend their entire time just spraying more out of the can, and that's ok. Shaving cream is cheap, the time and ability to practice with those muscles is priceless.
Shaving Cream on Tray with Brush and Squeegee