Thursday, July 30, 2009

Slide Painting

Rolling painty balls down the slide

Here’s a fun one for summer, and older preschoolers might not even get that messy.  Roll painty balls down the slide!  Of course, if you don’t want your slide to be painty afterward, make sure you cover it with paper.  This paper makes a great background for displaying children’s art inside once it’s dry.

In this picture you can’t really see what’s at the top, but there are several containers with paint them.  We put bins at the bottom of the slides so that the balls wouldn’t get covered in mulch and would be easy to collect.

For cleanup, use the hose.  If your kids are in bathing suits they can go down the slide with the water, cleaning the slide and having fun at the same time.

Alternatively, you can let kids do the painting AS they slide.  They can dip their hands in paint or use sponges.  I probably wouldn’t use paint brushes because, well, somebody could poke their eye out.  That wouldn’t be pretty!  If the kids do the sliding and painting they will be gloriously messy.  Have a hose or other water toy handy for washing off and lots of towels.

Technorati Tags: ,

Wednesday, July 29, 2009

Patti’s Baking Soda and Vinegar Compendium

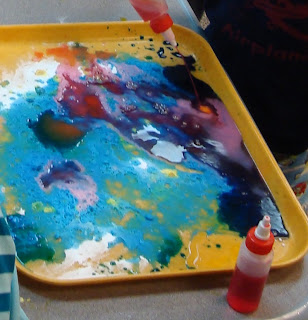
Baking Soda and Vinegar on a Tray

I’ve done a slew of baking soda and vinegar posts this summer. Hopefully they’ll inspire you to share your inner geek with a child in your life. Here’s the whole list:


This list is really only the tip of the iceberg. Notice that I didn’t even mention cereal box toys, and those were my big introduction to the fabulous world of chemistry when I was a kid. I think Cap’n Crunch had the best ones, though my mother rues the day we convinced her to buy such a cereal so we could fight over the toy inside.

So now I want to hear about your chemistry experiments with kids! There are others out there, but since baking soda and vinegar are easy to find and cheap they are the ones I see the most in early ed.

Friday, July 24, 2009

Thoughts on Food Allergy Article in April/May 2009 TYC

As you know, food allergies and how we, as professional educators, deal with them are important to me.  Recently, Teaching Young Children reran an article that was originally published in the March 2004 issue of Young Children, published by the National Association for the Education of Young Children (NAEYC).  Titled “That Food Makes Me Sick” Managing Food Intolerances In Early Childhood Settings it was an overview of food allergy issues for teachers.  I am hoping the link to it works so you can read it for yourself.  Normally articles in those two magazines require NAEYC membership, but I think it’s now available to the public.

Of course I think that any positive coverage of food allergies is important and I’m pleased that this article has appeared twice.  It can be very hard on a teacher to find out one of the students has a food allergy, particularly if it means that anticipated activities can’t be done the same way as they always have been.  Having a starting point is great.

I do have one peeve with the article, and I only share it because it’s important for educators to be aware of.  On page 45 there is a comment about having food allergic children wear plastic gloves for activities that include ingredients that might harm them.  While I applaud the thinking (keeping a kid safe and letting him/her participate) behind the recommendation, it bugs me for two reasons:

1. When you single a child out, it hurts.  And I’ve NEVER come across a recipe that couldn’t be altered or replaced to be safe.  You might have to shift gears a little and try a new recipe, but you can keep the learning intact without being so rigid.  What are you teaching?  How to make peanut butter sandwiches?  Or how to make sandwiches with spreads and knives and then cutting them into fractions?  Think about it.  Plus, what’s the point in participation if the child can’t enjoy the fruit of his or her labors?  That would irk most adults and it does for kids as well.  You’re just delaying the exclusion to the consumption part of the activity.

2. Have you ever watched a child wearing plastic gloves be able to DO anything effectively?  These kids are still mastering fine motor skills.  Adding an extra layer makes it that much harder.  Heck, I have trouble changing diapers with gloves on and I do it every day.  Why should I expect a young child to work with gloves on?  Plus, wearing gloves limits tactile sensations and may be difficult for children with sensory issues.

I do think there are times when wearing gloves is appropriate.  For example, if cleaning tables is a shared chore in your classroom or lunchroom and you think there may be an allergen on the tables, by all means provide gloves for your food allergic students.  Alternatively, you could find other things for them to clean, like desks.  Having an allergy is no excuse to get out of normal responsibilities.  Some other work with similar meaning should be substituted.

I’m pleased that early educators (that’s preschool through grade 3 in the States) are making an effort to protect the food allergic students in their care.  And I am grateful that the author of the article bothered to write it and NAEYC bothered to publish it.  Please don’t take this post as a criticism of their efforts; in fact, I’m grateful for them.

Wednesday, July 22, 2009

Do It With Lemons!

I just had to post this link here, since it’s related to all the baking soda and vinegar stuff I’ve been blogging about.  If you don’t like the smell of vinegar, do it with lemons instead and clean your counter at the same time.  Brilliant! 

Baking soda, dish soap, and lemons at Education.com.

Technorati Tags: ,

Monday, July 20, 2009

Grenades

Chemistry Grenade

Here you are, the LAST POST (for now) about vinegar and baking soda. Enjoy!

We don’t advocate violence here, but we had trouble coming up with a good name for this one that wasn’t weapon-like. It was either grenade or bomb. I guess ours were more like bombs since we didn’t throw them, but I think next time we’ll toss them. You definitely want to put them down and not stand too close, just in case. Alternatively, if you’ve got a bunch of little geeks, have them don their kid-sized protective eyewear.

For our last baking soda and vinegar experience at alumni camp we did it in little film canisters. Many of them had such tight lids that they just leaked a little when the pressure got too great, so you’ll want to test your canisters before doing it with the children. You want them to pop off, not ooze under pressure.

After camp I found this great Instructable that adds a little twist: a small plastic bag part that prevents the baking soda and vinegar from coming into contact with each other until you throw the grenade. I think this is a fabulous idea. I also think it would be great to add paint or watercolor and create a paper or fabric target of some kind.

Need a refresher on the chemical reaction itself? Baking soda + vinegar = water + carbon dioxide + sodium acetate (more or less).

Technorati Tags: ,

Friday, July 17, 2009

“Exploding” Paint

Waiting to Explode

You thought I’d end the baking soda and vinegar business with the volcanoes, didn’t you?  At alumni camp this year we did exploding paint.  The concept is a little cooler than the execution, but it was fun to experiment anyway.

We put some baking soda and paint in snack-sized sandwich bags and then used a funnel to pour in a little vinegar.  Zip it up quickly and then toss it.  At some point, it all bubbles out.  If you throw the bag with some force you get a slightly more exciting event.  We threw the bags onto white paper on a sidewalk so we could see what it looked like later.

We got this idea from one of our early experience education students.  I’m not sure she had actually done it, now that I have.  We did have lots and lots of colored bubbles, so it was fun that way.  But I can’t really say that anything truly exploded.

We also attempted this with Alka-Seltzer and soda water, but the results were about the same.

Need a refresher on the chemical reaction itself?  Baking soda + vinegar = water + carbon dioxide + sodium acetate (more or less).

Monday, July 13, 2009

How to Handle Food Allergy Emergencies

This is part of an occasional series on food allergies for classroom teachers. I hope to eventually put the posts all together for a presentation at a conference next year, but I’m having trouble deciding what teachers need to know. As a parent of food allergic children, I know a lot more than teachers should be expected to remember or take care of. I need to find the right balance of information. I’d love to have specific feedback on these posts in order to make them accurate, understandable, and helpful. Other topics will include: Food Allergy Basics, Preventing Food Allergy Emergencies, and Instructional Implications for Food-Allergic Students. Thanks for your input!

Emergency Action Planning
Every child with an emergency medication, including inhalers, EpiPens, and insulin, should have an emergency action plan that you have reviewed and practiced. Anyone who will be responsible for the child’s well-being needs to be made aware of the plan and where to find it.  Emergency action plan forms can be found in many places, including The Food Allergy and Anaphylaxis Network, and Safety Sack.

What should happen during an allergic reaction?
Follow the child’s action plan. Here are the steps that are part of most allergy action plans:

1. Assess severity: For breathing difficulty administer EpiPen and call 911. Remove the allergen (see next step) while waiting for ambulance if possible. If there is no immediate distress go directly to the next step.

2. Remove allergen: If the contact was a spill, remove clothing and wash any areas touched by the allergen. If allergen was ingested, be prepared for vomiting.

3. Antihistamine: If action plan indicates it, administer an antihistamine (such as Benedryl or Zyrtec). If possible, call a guardian to let them know what is happening, never leaving child alone.  If you have to choose between calling a guardian and staying with the child, stay with the child so you can monitor for signs of anaphylaxis.

4. Respiratory Distress: If respiratory distress develops administer EpiPen and call 911. Administer second EpiPen if paramedics have not arrived and breathing does not improve or gets worse after easing for awhile.

5. Call Guardian: Once paramedics have control of the situation, call a guardian. If an extra adult is present the guardian may be called sooner.

After the EpiPen has been administered a child should have constant supervision until the paramedics or a guardian arrives. Allergic reactions can have a rebound effect several hours after the initial incident. Even without a rebound reaction, an EpiPen will make a person jittery and sometimes emotional.

While there are some parents who want their child to stay in school after an EpiPen has been administered, this is not recommended.  They will not be able to focus while the medicine is in their system and they can’t be properly monitored for a delayed reaction.  If a guardian does not want their child to go to the hospital, insist that the child be taken home and supervised carefully.

Where should we keep the EpiPens and antihistamines?
Ideally, medications should be stored where they are most likely to be needed AND where they are most likely to be found. My children have EpiPens in their classrooms (older children should carry them on their persons), in the cafeteria, and in the office. Antihistamines are not emergency medications and can be kept in the office in most cases.  At my children’s school, non-emergency medications MUST be kept in the office. 

At the nursery school where I work we keep medications in each classroom’s backpack, which goes with us whenever we leave the room (even to go outside) and also contains emergency contact information for each child.  We have high hooks inside and outside to keep the backpacks out of harm’s way.

Technorati Tags: ,,

Wednesday, July 8, 2009

Volcanoes for Preschoolers

A Preschool Volcano

You can’t really do a series on baking soda and vinegar without bringing out the volcanoes.  But since most preschoolers have very little practical experience with volcanoes it doesn’t make sense to do any sort of a unit on the things.  Instead, we try to get the sense of one in the hopes that this knowledge helps them learn about them later.

First you need a volcano.  We had made play dough in class with the kids a few days before that had somehow not kept well, so we used that.  The children helped even though they really had no idea what we were going for.  We tried showing them volcano pictures and read a few books but the information didn’t transfer well.  We made two volcanoes and put them on trays that we took outside.  We put a small pile of baking soda inside each model.

Since we’re not going for realism, I let the kids pick the color for the lava.  On the day I took these pictures, they first picked green.  Unfortunately, since the play dough we made was blue, it wasn’t quite the thrill it could have been.  The red lava was much more interesting for the second batch.

It's Hard to Fill a Volcano with Droppers

As we had practiced with droppers and syringes the day before, that’s what we provided for adding the vinegar to the baking soda.  We were able to do this for quite awhile without reloading.  I was a bit surprised at how little baking soda I had to add for this experience.

Even though we weren’t studying volcanoes we did talk about lava and magma as well as how hot it all would be if they were real.  Some how igneous rocks even got mentioned.

I highly recommend doing this outside or in your sensory table if you can’t go out.  It was spring when we did this, so we all had jackets on and it was still fine.  We had plenty of towels with us but didn’t really need them.  The biggest temptation for them was not to put their hands into the volcanoes.  While that makes for a fun ending, the play dough gets very squishy during the eruptions and can’t support a child’s weight.  Once the hands get in there, it’s all over.  And of course, that’s how it ended!

Allergy Note: We did this with gluten-free play dough.  If you have a gluten allergy in your class, by all means do the same.  It works fine.  If you don’t, regular play dough will work just as well if not better.

Need a refresher on the chemical reaction itself?  Baking soda + vinegar = water + carbon dioxide + sodium acetate (more or less).

Friday, July 3, 2009

Baking Soda and Vinegar with Threes

Droppers Galore

With threes I do a similar setup as I do for the twos, namely on trays.  But instead of squeeze bottles I provide several types of droppers and syringes.  We’re working on our fine motor control as well as investigating how fluids work in addition to our chemistry when we do it this way.  I usually set it out with the droppers and syringes filled so that there’s some instant gratification that encourages the kids to try the droppers and syringes themselves.  Otherwise they sometimes get discouraged before they get success.  Doing it once is usually enough to keep them trying until they get it.

While we’re here, do YOU know how a dropper or a syringe works?  What’s the principle behind it?  Well, I’ll tell you.  It’s a vacuum!  That’s right, you’ve got a little bit of nothing in that dropper when you squeeze out all the air and then put it in the liquid.  When you release the dropper head the liquid fills the vacuum.  For the syringe, you create the vacuum and fill it when you pull up on the plunger.

I put my droppers in a set of watercolor paint cups, but you could just as easily use small cups.  The tricky thing with this setup is refilling the wee cups.  Get yourself a small pitcher and prefill it with the vinegar to make it easy.  But be forewarned: if you put the pitcher in reach of the children you will have helpers!  I’m all in favor of letting kids do the pouring if we’re outside, but our custodian takes issue with saturating the carpet with anything he didn’t do himself so I do the refilling myself when we’re inside.  And yes, I’ve tried to do this with something on the floor to catch the overflow and I’m sure you know how well that worked out if you’ve tried it yourself!  Anyway, I will let the children help me add watercolor to the vinegar, inside or outside.

Trays and Droppers Ready for Work

Threes also enjoy doing this activity in the sensory table.  If you really trust your threes, try putting the vinegar in spray bottles!

Need a refresher on the chemical reaction itself?  Baking soda + vinegar = water + carbon dioxide + sodium acetate (more or less).

Wednesday, July 1, 2009

Baking Soda and Vinegar with Twos

Setup for Twos

Here’s how I like to set up experimentation for my two-year olds. I use trays on a low table. I spread baking soda on the tray and then fill small squeeze bottles with vinegar.

Tips:

  • Keep the tops on the squeeze bottles twisted down low so it doesn’t all pour out so fast that the joy is gone immediately. Then it becomes more about pouring rather than observing the reaction.
  • Have a funnel that fits in the top of your squeeze bottles handy for refilling the vinegar. Unless you have an unlimited supply of bottles you will be doing this A LOT.
  • Put some dish soap in the squeeze bottles. Not only does it make the vinegar come out a little more slowly but it makes the reaction slower. The Trays Get a Bit Wet
  • Put a little liquid watercolor in the squeeze bottles. I just use primary colors. This way you have something to talk about with the kids who aren’t impressed by the bubbles.
  • Have more baking soda standing by. When the bubbles stop but there’s still vinegar left, you can add more. You may need to dump the trays periodically.

If you do this outside then cleanup is a breeze. Just dump the trays outside and clean them with the hose (or let the kids do it). You can also do this activity in the sensory table, but for some reason there seems to be more squirting in eyes at this age when you do it there.

Scientists at Work

Need a refresher on the chemical reaction itself? Baking soda + vinegar = water + carbon dioxide + sodium acetate (more or less).